Let’s face it, folks—Facebook can be a love-hate relationship. Sometimes, you just need a break. Whether you’re trying to detox, free up space, or simply don’t want the app anymore, uninstalling Facebook on your Android device is easier than you think. But hold up! Before you dive into the process, let me break it down for you step by step so you don’t get lost along the way.
Now, you might be wondering, “Do I really need to go through all this trouble?” The short answer is yes—if you’re serious about cutting ties with Facebook. Uninstalling it isn’t just about deleting an app; it’s about reclaiming control over your digital life. Whether you’ve had enough of the endless scrolling or are worried about privacy issues, this guide will walk you through every single step.
So grab a cup of coffee (or tea, if that’s your thing), sit back, and let’s tackle this together. By the end of this article, you’ll have the confidence to uninstall Facebook on your Android desktop without breaking a sweat.
Read also:Pisces Season
Table of Contents
- Why Would You Want to Uninstall Facebook?
- Preparing for the Uninstallation Process
- Step-by-Step Guide to Uninstall Facebook
- Different Methods to Uninstall Facebook
- Common Issues During Uninstallation
- Tips for a Successful Uninstall
- Privacy Concerns After Uninstalling
- Alternatives to Facebook
- Frequently Asked Questions
- Final Thoughts
Why Would You Want to Uninstall Facebook?
Before we dive into the nitty-gritty of how to uninstall Facebook, it’s worth asking yourself why you’re doing it in the first place. Is it because you’re tired of the constant notifications? Or maybe you’re worried about data privacy? Whatever your reason, here are some common motivations:
- Data Privacy: Facebook has been under fire for its data collection practices. Uninstalling the app can give you peace of mind.
- Time Management: Social media can be a massive time sink. Removing Facebook might help you focus on more important things.
- Device Performance: Apps like Facebook can take up a lot of storage and slow down your device. Deleting it can improve performance.
- Digital Detox: Sometimes, you just need a break from the online world. Uninstalling is the first step toward a healthier digital lifestyle.
And hey, if none of these reasons resonate with you, that’s okay too! Maybe you’re just ready for a change. Whatever your reason, this guide’s got you covered.
Preparing for the Uninstallation Process
Alright, champ, let’s get ready to rumble. Before you hit that uninstall button, there are a few things you should do to make sure everything goes smoothly:
Backup Your Data
First things first—backup your important data. Facebook stores a ton of info, from photos to messages, and you don’t want to lose any of it. Here’s how:
- Go to Facebook’s settings on your device.
- Select “Download a Copy of Your Facebook Data.”
- Follow the prompts to download your data to your computer or cloud storage.
Trust me, this step could save your bacon if you ever decide to reinstall the app in the future.
Log Out of All Devices
Next up, log out of all devices where you’re signed into Facebook. This ensures that no one else can access your account after you uninstall. Here’s how:
Read also:Renn Hawkey
- Go to Facebook’s security settings.
- Select “Where You’re Logged In.”
- Log out of all active sessions.
Boom! You’re now officially logged out from every device. Feels good, right?
Step-by-Step Guide to Uninstall Facebook
Alright, let’s get down to business. Here’s a step-by-step guide to uninstall Facebook on your Android device:
Step 1: Open the App Drawer
First, swipe down from the home screen to open the app drawer. It’s where all your installed apps live. Easy peasy.
Step 2: Locate Facebook
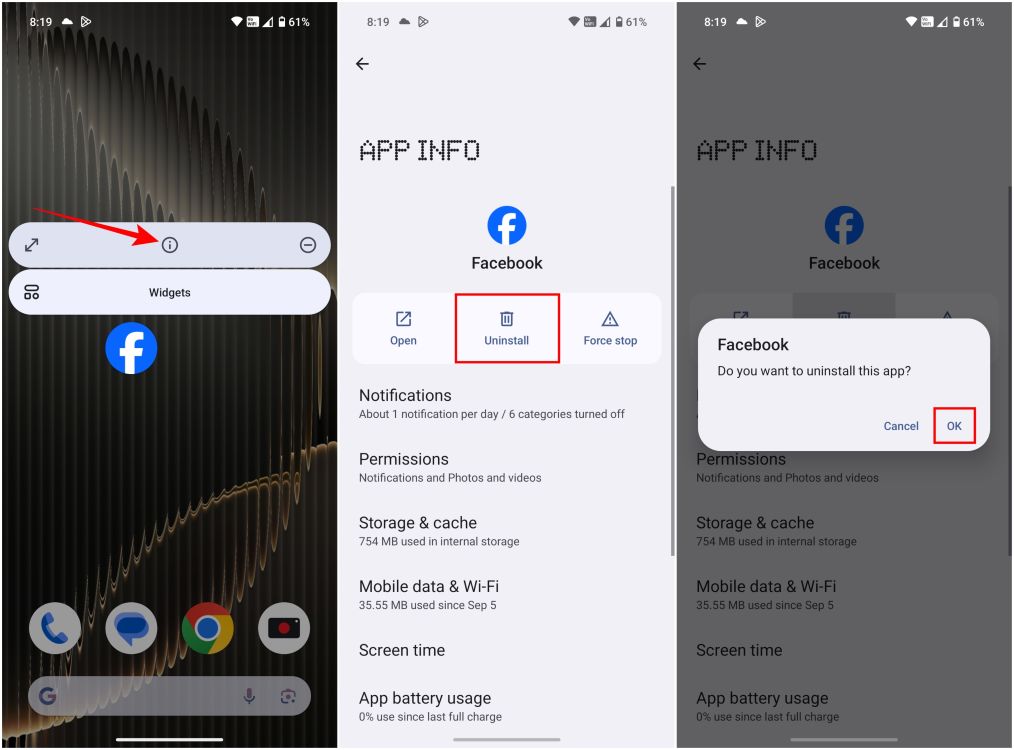
Now, scroll through the list until you find Facebook. Tap and hold the app icon for a few seconds. This will bring up a menu with options.
Step 3: Select Uninstall
From the menu, select “Uninstall.” A confirmation prompt will appear. Tap “OK” to proceed. And just like that, Facebook is gone from your device.
But wait, there’s more! Let’s explore some alternative methods to uninstall Facebook.
Different Methods to Uninstall Facebook
Sometimes, the standard method doesn’t work as expected. Don’t worry, there are other ways to get rid of Facebook. Here are a few:
Method 1: Using the Play Store
If the app drawer method isn’t your cup of tea, you can always uninstall Facebook via the Play Store. Here’s how:
- Open the Play Store on your device.
- Tap your profile icon in the top-right corner.
- Select “Manage apps & device.”
- Find Facebook in the list of installed apps.
- Tap “Uninstall.”
Voila! Facebook is history.
Method 2: Using Settings
Another option is to uninstall Facebook through your device’s settings. Here’s the lowdown:
- Go to “Settings” on your Android device.
- Select “Apps & notifications.”
- Tap “See all apps.”
- Find Facebook in the list and tap on it.
- Select “Uninstall.”
And just like that, Facebook is kaput.
Common Issues During Uninstallation
Sometimes, things don’t go as planned. Here are some common issues you might encounter during the uninstallation process:
Issue 1: App Won’t Uninstall
If Facebook refuses to uninstall, try clearing its cache and data first. Here’s how:
- Go to “Settings.”
- Select “Apps & notifications.”
- Find Facebook and tap on it.
- Select “Storage & cache.”
- Tap “Clear cache” and “Clear data.”
- Now try uninstalling again.
Problem solved!
Issue 2: Reinstallation After Uninstall
Sometimes, Facebook might reinstall itself automatically. To prevent this, disable auto-updates in the Play Store:
- Open the Play Store.
- Tap your profile icon.
- Select “Settings.”
- Choose “Network preferences.”
- Turn off “Auto-update apps.”
No more pesky reinstallations!
Tips for a Successful Uninstall
Here are a few tips to ensure your uninstallation process goes smoothly:
- Double-check that you’ve backed up all your data before uninstalling.
- Log out of all devices to ensure no one else can access your account.
- Consider disabling auto-updates in the Play Store to prevent reinstallation.
- Take a deep breath and enjoy the freedom of a Facebook-free life!
Trust me, you’ll feel lighter already.
Privacy Concerns After Uninstalling
Even after uninstalling Facebook, there are still some privacy concerns to consider:
Data Collection
Facebook may still collect data about you through other apps and websites. To minimize this, review your privacy settings on Facebook’s website:
- Go to Facebook’s settings.
- Select “Privacy shortcuts.”
- Adjust your settings to limit data collection.
Third-Party Apps
Other apps may still have access to your Facebook data. To revoke this access:
- Go to Facebook’s settings.
- Select “Apps and Websites.”
- Revoke access for any apps you no longer use.
Now you’re truly in control of your data.
Alternatives to Facebook
So, you’ve uninstalled Facebook—what’s next? Here are some alternatives to consider:
- Twitter: A great platform for real-time updates and news.
- Instagram: Perfect for sharing photos and videos.
- Reddit: A community-driven platform for discussions and sharing.
- LinkedIn: Ideal for professional networking.
There’s a whole world of social media out there waiting for you!
Frequently Asked Questions
Let’s tackle some common questions about uninstalling Facebook:
Q1: Can I recover my data after uninstalling?
Absolutely! As long as you backed up your data before uninstalling, you can easily recover it later.
Q2: Will I lose my Facebook account?
Nope! Uninstalling the app doesn’t delete your account. You can always reinstall the app and log back in.
Q3: Can I delete my Facebook account permanently?
Yes, you can delete your account permanently by following Facebook’s deletion process. Just be sure you really want to do it, as this action is irreversible.
Final Thoughts
And there you have it, folks—a comprehensive guide to uninstalling Facebook on your Android device. Whether you’re doing it for privacy, time management, or simply because you’re ready for a change, remember that reclaiming control over your digital life is a powerful step.
So go ahead, take that first step toward a Facebook-free life. And don’t forget to share this guide with your friends who might be thinking about doing the same. Together, we can all enjoy a healthier digital lifestyle.
Until next time, stay connected but not consumed. Cheers!